Are you trying to build a more profitable email autoresponder series, but you’re not sure where to start?
Autoresponders can be one of the biggest revenue drivers for your business. It’s an affordable and consistent way to nurture your new leads and guide them down your sales funnel.
And since you only need to set things up once, autoresponders also offer busy business owners a way to save time while still earning money.
But how do you create an autoresponder series that actually works?
That’s exactly what we’re going to cover today. Because, in this post, I’m going to teach you 7 steps to create an email autoresponder series that gets you more sales.
First, though, let’s get clear on what an autoresponder series is and why it’s such an effective strategy.
- What Is an Email Autoresponder?
- Benefits of Email Autoresponders
- How to Create an Email Autoresponder Series
What Is an Email Autoresponder?
In marketing, an email autoresponder is an email or email series that is automatically sent to a specific segment or subscriber of your email list. Autoresponders are often triggered by a specific action from a subscriber, such as:
- Opting in to an email newsletter
- Registering for a webinar or event
- Signing up for a lead magnet
- Abandoning a shopping cart
- Making a purchase
They can also be triggered by a user’s birthday or anniversary.
Businesses set up these autoresponders through email automation technology. Most marketing email service providers (ESPs), such as Constant Contact and Brevo (formerly Sendinblue), include automation functionality.
The best autoresponders include multiple emails, rather than a single message. Email sequences give you more opportunities to nurture your leads, catch their attention, and convince them to buy.
Here are some examples of email autoresponder series:
- Welcome email series: Instead of sending a single welcome message to new subscribers, send them a series of emails to gradually introduce them to your brand.
- Onboarding email series: Teach new customers everything they need to know about your product or service
- Abandoned cart email series: Ecommerce businesses can remind shoppers about products they’ve left in their cart. Follow up with special offers to encourage them to complete their checkout.
Note: Email autoresponders differ from transactional emails, such as order confirmations. For transactional emails, you’ll need an SMTP service.
Benefits of Email Autoresponders
But now, you might be wondering, “Do I really need to create an email autoresponder? Can’t I just manually send emails a few times a month?”
The answer is simple: every online business needs an autoresponder. There are simply too many benefits to ignore. That’s because autoresponders:
- Nurture Your New Subscribers: You can gradually encourage each new lead, slowly nudging them toward their first purchase.
- Transform Leads into Customers: In the end, you can use your autoresponders to convert more leads into customers.
- Retain Existing Customers: Improve customer retention by making sure every new customer is fully trained to make the most of your product. Onboarding emails are especially important for Software as a Service (SaaS) companies.
- Encourage More Purchases: Autoresponders make it easy to upsell and cross-sell by recommending products based on past purchases
- Become More Effective Over Time: By tracking your autoresponder series’ success, you can make it more effective to drive profits for months and years to come.
- Run on Autopilot: Once you’ve built the right autoresponder, it will work automatically, which saves you hours of time in the long run.
Now that we know the benefits of creating an autoresponder, we’re going to teach you exactly how to make one.
So get ready and follow along with our 7 steps on how to create a profitable email autoresponder series.
How to Create an Email Autoresponder Series
There are really 3 phases to creating an effective email autoresponder series:
- Preparation
- Creation
- Optimization
We’ll be breaking everything down into 7 simple steps anyone can follow.
- Step 1: Capture You Visitors’ Email
- Step 2: Send New Leads to Your Email Service Provider
- Step 3: Segment Your Audience With Tags & Field Mapping
- Step 4: Map Out Your Autoresponder Series
- Step 5: Craft Your Emails
- Step 6: (Optional) Prepare Your Landing Pages
- Step 7: Test, Tweak, & Track for Improvements
The first 4 steps fall under the umbrella of “preparation,” the next 2 steps can be considered the “creation phase,” and the last step goes to “optimization.”
This is important to understand because you might find you already have some of these steps finished, particularly in the preparation phase.
That means you’re likely ahead of the game and can set up your autoresponders even faster.
Now let’s dive into our first step.
Step 1: Capture Your Visitors’ Email
First and foremost, you need to have a system in place for capturing your audience’s email addresses.
If you want people to sign up for your email list, you’ll want to offer an incentive, such as a discount, free ebook, or exclusive content.
That means you’ll need a tool that allows you to show relevant offers to your website visitors, so they’ll be more likely to opt in to your email marketing.
Plus, by
When looking at the lead generation services available, there’s frankly no better tool than OptinMonster:
OptinMonster is hands down the best software for growing your email list. It offers businesses of all sizes an easy and professional solution for presenting offers to new leads and sending new emails where they belong.
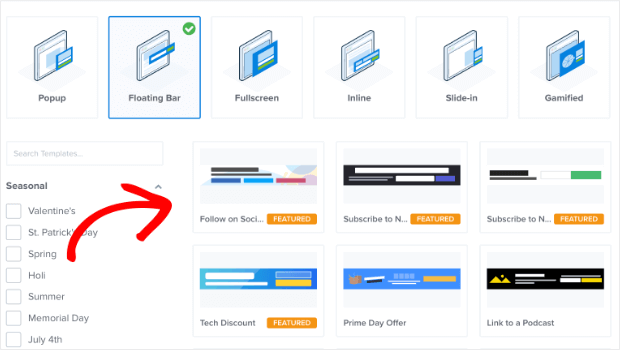
And the best part is that OptinMonster is so easy to use, anyone can create stunning optin campaigns like popups, floating bars, fullscreen welcome mats, and more in a matter of minutes.
Everything starts with selecting one of OptinMonster’s 100+ premade templates for the campaign you want to build:
From there, you can make changes to your campaign without any coding skills or design experience.
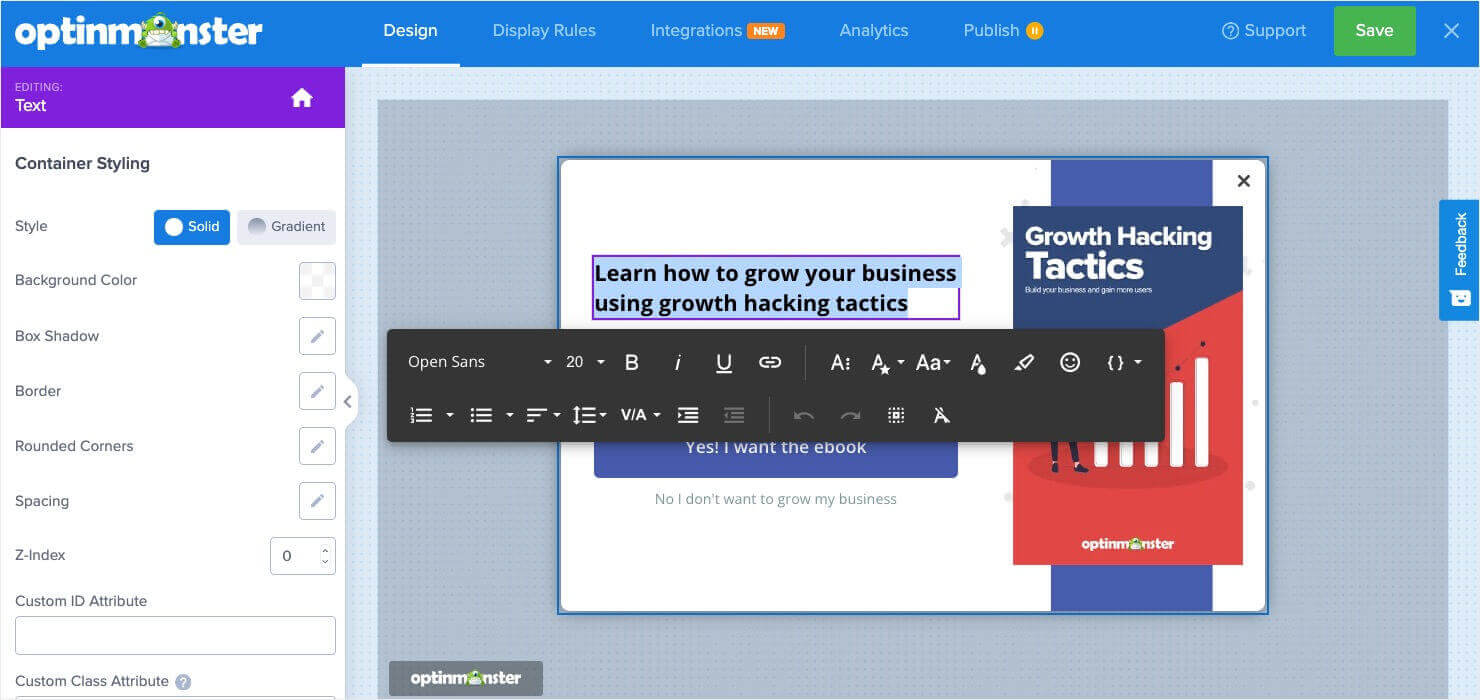
If you want to change the text of your campaign, for example, you can simply use OptinMonster’s inline text editor:
This allows you to change elements of your text, such as:
- Font
- Font-family
- Size
- Color
- Alignment
- Line height
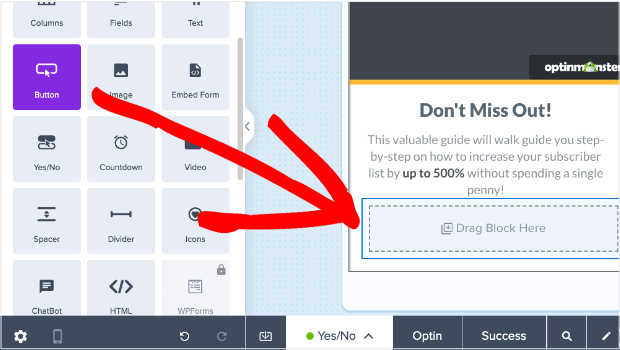
And much more. But what if you want to add a new feature to your campaign, like an image, more text, a video, chatbot, and so on?
For that, OptinMonster has a drag-and-drop editor that lets you drag new elements in place:
And since OptinMonster is designed using these draggable blocks, everything always comes out looking professional.
That means literally anyone can build campaigns like this one in a matter of minutes:
OptinMonster gives you everything you need to save time, money, and headaches while generating more leads for your email list.
And once you have the perfect campaign, you’re ready to target your audience.
OptinMonster comes with more targeting rules and triggers than any other lead generation software on the market. These are things like:
- Exit-Intent® Technology: Show campaigns as people are actively leaving your website.
- OnSite Retargeting®: Display follow-up offers to returning visitors who didn’t click on your first offer.
- Geolocation Targeting: Show campaigns to people based on where they’re physically located.
These are just 3 examples of OptinMonster’s popular targeting and triggering rules, but there are many others.
The point is that OptinMonster gives you total control over where, when, and to whom your campaigns appear.
This freedom unlocks tons of options for personalization that are guaranteed to get you higher conversion rates across your site.
Sound too good to be true? Just check out these success stories that OptinMonster customers have achieved:
- Crossrope explodes its list by 900%
- Adam Enfroy adds 11,000+ subscribers to his list in 1 year
- Shotkit attracts 40+ NEW leads to its list every single day
You can achieve the same success by clicking below to start your 100% risk-free OptinMonster account today:
Once you have your lead generation system in place, you’ll need to make sure you have the right email provider to store your leads.
Step 2: Send New Leads to Your Email Service Provider
The next step is to select the right email service provider (ESP) for your business.
There are TONS of options on the market, so you’ll want to make sure you find the best ESP for your marketing goals.
Here are a few factors you should be looking for with any ESP:
- Affordability: Is the ESP something that is within your current budget?
- Ease of Use: Are you able to set up and run automated email campaigns easily, or is there a high learning curve?
- Scalability: Will this ESP allow you to scale your business, or will prices hike up after you grow your list?
And while, again, you’ve got plenty of options, we highly recommend going with 1 of these 4 services:
- Constant Contact: an excellent solution for small businesses who value phone/email support
- Brevo (formerly Sendinblue): the perfect choice for businesses on a budget looking for a free option to get started
- HubSpot: the best choice for growing businesses that want an option that can scale with them
- Drip: the most advanced option for eCommerce
We’ve found that these 4 ESPs are the most reliable for many small to medium-sized businesses.
More than any other ESP around (including Mailchimp), these 3 options will allow you to scale your business at a price you can afford.
Plus, each of these ESPs has lots of autoresponder features, so you can set up the perfect automation workflows for your business.
They also integrate natively with OptinMonster, which means you can send your new leads seamlessly to each platform. Our ESP integration also lets you send each new lead to the appropriate audience segment.
But, to be fair, you can hook up ANY email provider with OptinMonster, so that doesn’t need to be your deciding factor.
Still Deciding on an Email Marketing Platform?See more suggestions in 7+ Best Email Service Providers for Small Businesses
Step 3: Segment Your Audience With Tags & Field Mapping
I already mentioned that OptinMonster lets you send your subscribers to the appropriate email list segment. Let’s discuss this important step in more detail.
Audience Segmentation is the process of breaking down your email list into smaller groups so you can personalize your messaging even further.
For example, let’s say you run an online cooking course. And you had 2 different types of lead magnets on your website:
- A downloadable cookbook loaded with recipes
- A coupon for 30% OFF your next course
People who sign up for each of these leads are likely doing so for a different reason.
Someone might sign up for the cookbook because they love your brand and content but aren’t totally ready to enroll in your course.
In that case, you’d want an autoresponder series that spends more time nurturing your new lead.
But for people who downloaded the coupon for your next class, you need a different approach. That’s because this type of lead is nearly ready to pull out their credit card and buy.
You’d want a more aggressive autoresponder series that shows all the benefits of taking your cooking course.
This is just a small example of the value of segmenting your email lists.
But now for the big question: how do you segment your email lists in a way that’s organized and easy to manage?
You’ll need to do 2 things to set up your segmentation:
- In your ESP, you’ll most likely create a series of “tags” that you apply to different contacts in your list.
- In OptinMonster, you’ll use field mapping to make sure your new contacts receive the appropriate tag in your ESP.
Remember the example we just gave of using a free downloadable cookbook as a lead magnet?
You can create a “cookbook download” tag in your ESP, and you can add that tag to every subscriber who signs up through that lead magnet campaign.
That tag will let you make sure that those subscribers get an automatic email with the lead magnet they signed up for. It’ll aso help you to send more personalized email campaigns in the future.
The exact method for tagging your contacts will vary depending on the ESP you’re using.
On the OptinMonster side, you’ll use our field mapping features to connect the information you get from OptinMonster with the appropriate tags in your ESP.
Case StudyHow SnackNation Adds 1200 Segmented Leads Every Week!
Step 4: Map Out Your Autoresponder Series
This is one of the most important steps, so don’t miss it: you need to map out your autoresponder series before you start writing your emails.
If you’ve selected an ESP with good marketing automation features, it will be simple to set up your email automation workflow. In other words, you’ll be able to choose the trigger for your autoresponder, as well as the order and timing of your email series.
When planning your workflow, you’ll want to consider these questions:
- What is the goal of this autoresponder series?
- Who is the exact audience segment for this autoresponder series?
- How many emails will be in the autoresponder series?
- What timeframe will these emails be sent in?
These 4 questions will guide your planning and save you the most time. From there, you’ll be able to map out your emails more clearly.
Each autoresponder will be unique to your business, your offer, and the segment of your audience list.
But here’s a hypothetical example of how you might map out an autoresponder series based on the 4 questions listed above:
Autoresponder Series #1
- The goal is to get people to purchase an upcoming cooking class
- The audience is people who downloaded a 30% coupon
- The series will consist of 5 emails in total
- Each email will be sent 2 days apart
From there, you’d simply need to map out the emails and a note about their goal:
- 1st Email: Thank you for downloading the coupon
- 2nd Email: Provide information about the upcoming course
- 3rd Email: Special offer to download an additional cheat sheet with recipes
- 4th Email: Reminder that the coupon is about to expire in 24 hours
- 5th Email: Last chance! The coupon will expire in 2 hours
And with that, you have the basic outline of an email autoresponder series.
With this email series, your audience gets tons of valuable information, and you can grow your business.
Next up is crafting your emails.
Step 5: Craft Your Emails
Writing emails for your autoresponder series can be as easy or as difficult as you make it.
Many marketers overcomplicate their offers, load their emails with tons of calls to action (CTAs), and aren’t clear who the email is really addressing.
But the best email marketing campaigns do the opposite: they keep things super simple.
Here are a few best practices for crafting the perfect email:
Create Enticing Subject Lines
Your subject line is arguably the most important part of your email series. If your subject lines aren’t perfect, no one will open the email itself.
And if no one opens your email, you won’t make any sales.
Need help coming up with better subject lines? Read through this resource for more help: 164 Best Email Subject Lines to Boost Open Rates.
Use Personalization
Personalizing your emails’ content will make your message infinitely more relevant and valuable to subscribers.
Personalization is so much more than inserting your subscriber’s first name into the email. You need to tailor the actual content of the email to address their needs.
This is exactly why you took the time to properly segment your audience. Once you know which lead magnet attracted them to your list, you can customize your emails to speak about those offers. And you can promote other related offers you may have.
Use Persuasive Language that Connects With Your Audience
You want to write your emails as if you were speaking directly to the person reading your message.
How do you accomplish this? By turning your focus away from yourself and to the reader.
Offer ways to solve your audience’s problems rather than simply talking about your own products.
For extra help, ask yourself the following questions before each email you write:
- What are the biggest pain points/struggles for my subscribers?
- What are the current goals of my subscribers?
- Why did they subscribe to my list in the first place?
- How can I solve their current problem in this email?
- Why should they read this email? What is the big benefit to them?
For more information on how to craft the perfect email, check out this helpful guide: 17 Tips for Writing Email Copy That Converts.
Step 6: (Optional) Prepare Your Landing Pages
A landing page is a standalone web page created for a marketing campaign. It is optimized for a single purpose, such as selling a specific service. Landing pages are often link to in email marketing campaigns, social media posts, and pay-per-click (PPC) advertising
This step is optional because you may or may not link to a landing page from your email autoresponder series.
In some cases, you might just link to a blog post, existing product page, or case study. But in other situations, you’ll want to have a professional landing page ready for product recommendations in your email campaigns.
Having a dedicated landing page allows you to consistently match your copy across your optin campaign, email campaign, and landing page. You can use persuasive language throughout each step, as you use to guide your audience down the sales funnel.
By staying consistent with your personalization and messaging, you can more easily boost sales across your site.
But how do you create a professional-looking and high-converting landing page if you’re not a website builder?
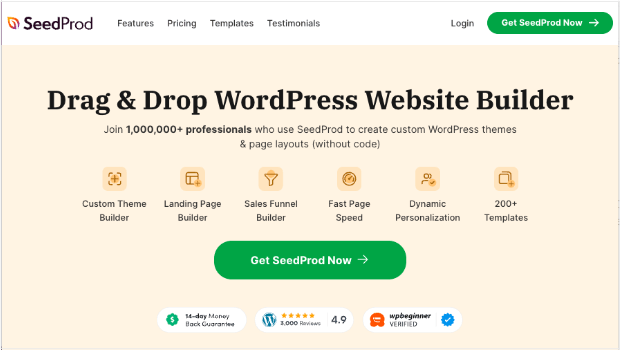
If you’re using WordPress, the answer is simple: use SeedProd:
SeedProd is the best landing page builder for WordPress. It allows you to build professional landing pages in a matter of minutes, even if you have no coding skills at all.
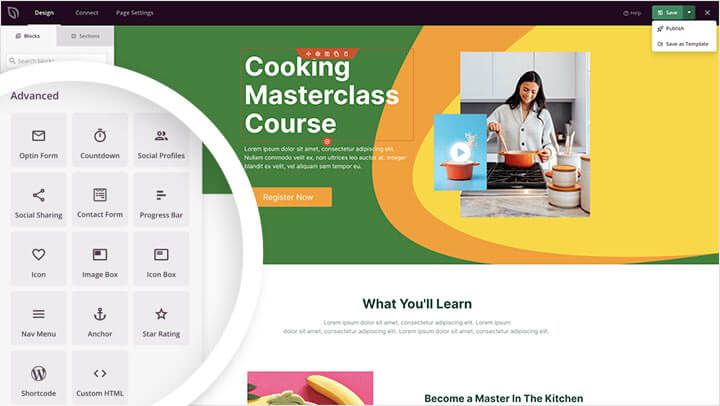
With SeedProd, you can use one of their pre-built templates to start with. This will save you tons of time and energy as you put your landing pages together.
From there, you can use their page editor to drag and drop new elements into place:
Making customizations like this is super intuitive and doesn’t take long to master.
In fact, anyone can use SeedProd to create a highly-effective landing page in minutes.
Plus, SeedProd comes with the following features:
- Drag and drop builder
- Inline text editor
- Responsive and mobile-friendly
- Subscriber management
- Smart sections
- Landing page templates
- And much more…
Again, if you’re using WordPress, there’s simply no better solution for creating landing pages than SeedProd.
Ready to see for yourself? Learn more about SeedProd today!
Step 7: Test, Tweak, & Track for Improvements
Although it is mostly hands-off, an email autoresponder series is not something that you should create one day and then completely forget about the next.
To get the best results, you should be monitoring the performance of your emails to identify areas that need improvement. Then, use A/B testing to optimize your subject lines, headings, and CTAs.
Here are a few helpful metrics you may want to keep your eyes on:
- Open Rates: How many people are opening your emails? If this is too low, it likely means your subject lines aren’t interesting enough.
- Click-Through Rates (CTR): How many people are clicking on the CTAs in your email? If this metric is too low, it likely means your email copy could be stronger.
- Unsubscribes: Are people staying on your email list or instantly unsubscribing? If unsubscribes are too high, it means your lead magnet likely isn’t attracting the right audience to your list.
- Custom Conversions: Are people buying what you’re selling? You should set up custom conversions and track revenue coming specifically from your email campaigns. That way, you can see if changes have an impact on your overall revenue.
By keeping a close eye on these 4 metrics, you can easily create a more profitable autoresponder series that drives revenue for months–or years–to come.
And that’s it! These have been 7 steps to create a profitable email autoresponder series.
We hope you enjoyed this article. If you did, you might want to check out the following resources, too:
- Email Marketing Made Simple: Your Step-by-Step Guide
- How to Run an Effective Email Marketing Campaign
- Email Marketing for eCommerce: 7 Tips for Success
- 7 Best Email Service Providers for Small Businesses
These articles will have everything you need to take your email marketing strategy to the next level, so you can drive passive revenue for years to come.
And remember, the 1st step to creating effective autoresponders is to a large email list full of segmented leads. And OptinMonster is the very best way to get started!




Add a Comment